

Do you want to know how to build a DIY standing desk yourself? In times of home office, many people probably want to have a height-adjustable standing desk. In this article, I will show you how easy it can be to build a height-adjustable diy standing desk using only a cordless drill and, optionally, a jigsaw.
* = Affiliate Links /Advertising
As an amazon associate i earn from qualifying purchases.
Advertising

Necessary Tools
- Drill*
- Jigsaw*
- Hole Saw 60mm Drill Bit*
- Drilling Aid / Drill Jig*
- Countersinker*
- Paint Kit*
- 6mm Drill Bit*
- 5mm Drill Bit*
Necessary Material
- Standing Desk Frame* OR Standing Desk Frame 2*
- Desk Table Top (Maple)* OR Desk Table Top (Black)* OR check IKEA 🙂
- Under Desk Cable Management Tray* OR Under Desk Cable Management Tray*
- Round Desk Grommet Silver* OR Round Desk Grommet Black*
- [2 pcs.] Rectangular Cable Grommet*
- USB Desk Hub*
- Cable Spine*
- Insert Nut Set*
- M5x16mm Bolt*
- M5x10mm Bolt*
- M4x10mm Bolt*
Material Costs: 250 – 600£
3D CAD Drawings

Which table top for a desk?
The selection of table tops for a desk is large and you can even find some in the DIY store. The price range for table tops is at least as wide. I really wanted to use a solid wood top for the height-adjustable desk, but at the same time I wanted to keep an eye on the costs. In the end, I was left with glue-laminated boards. The quality in the DIY stores didn’t appeal to me. There were always too many repaired areas where a lot of filler was applied.
I then decided on the GERTON glued wood panel from Ikea and I am very happy with the choice – also because there are two metal rails on the underside for reinforcement. Alternatively you can go check out the offers at your local DIY and Hardware Store. In case you want to order an affordable desk table top online have a look at the table tops I linked above.
How to Install a Desk Cable Grommet
The first step is to prepare the tabletop for the installation of the cable outlets and the USB hub. First, mark the positions where the rectangular cable grommets and the USB hub are to be placed with a ruler*. You can see the position of the cable outlets in the 3D drawing above.

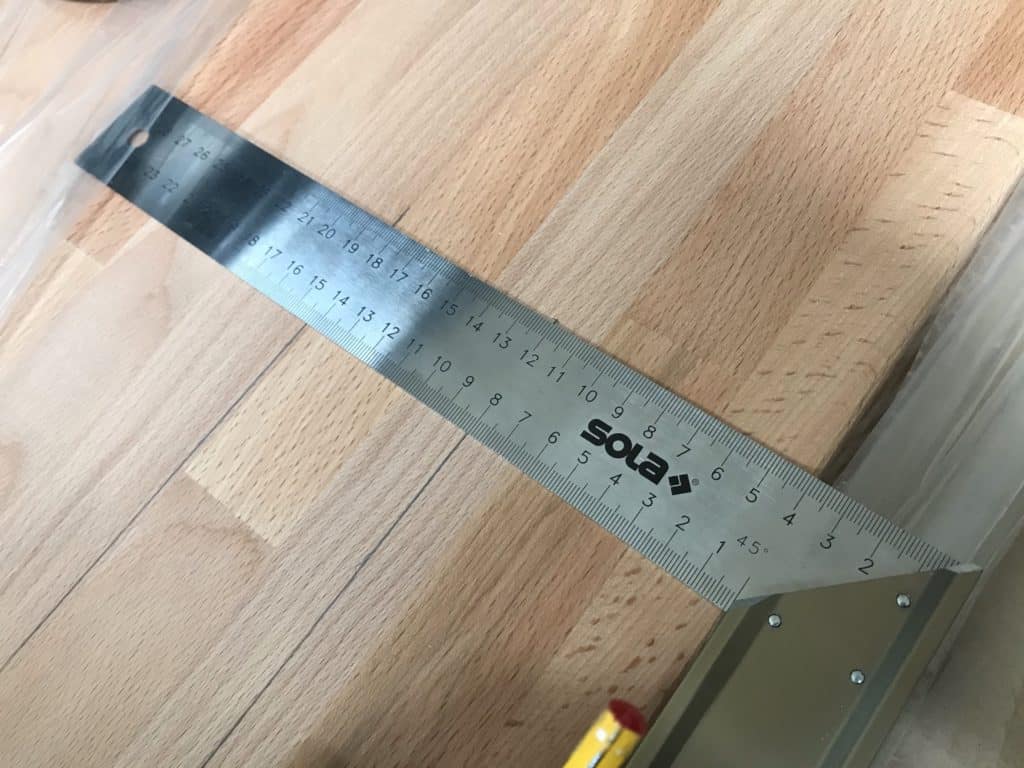


For the rectangular cable grommets, I decided to place them left and right to the central screen position. In the end, there are more than enough options for routing cables from two or three screens, lamp, keyboard and mouse etc.
It is best to drill a vertical hole at all four corners of the marks for the cable apertures using the drilling aid* in the inner corners – this makes it much easier to saw out the recess with the jigsaw.


Then place the jigsaw in one of the four holes and saw straight along the line to the next hole – until the rectangular recess finally pops out. Be sure to saw from the top of the tabletop, not from the bottom. If the saw blade runs at an angle, you will at least have cut out the correct dimension on the top side (where it counts).


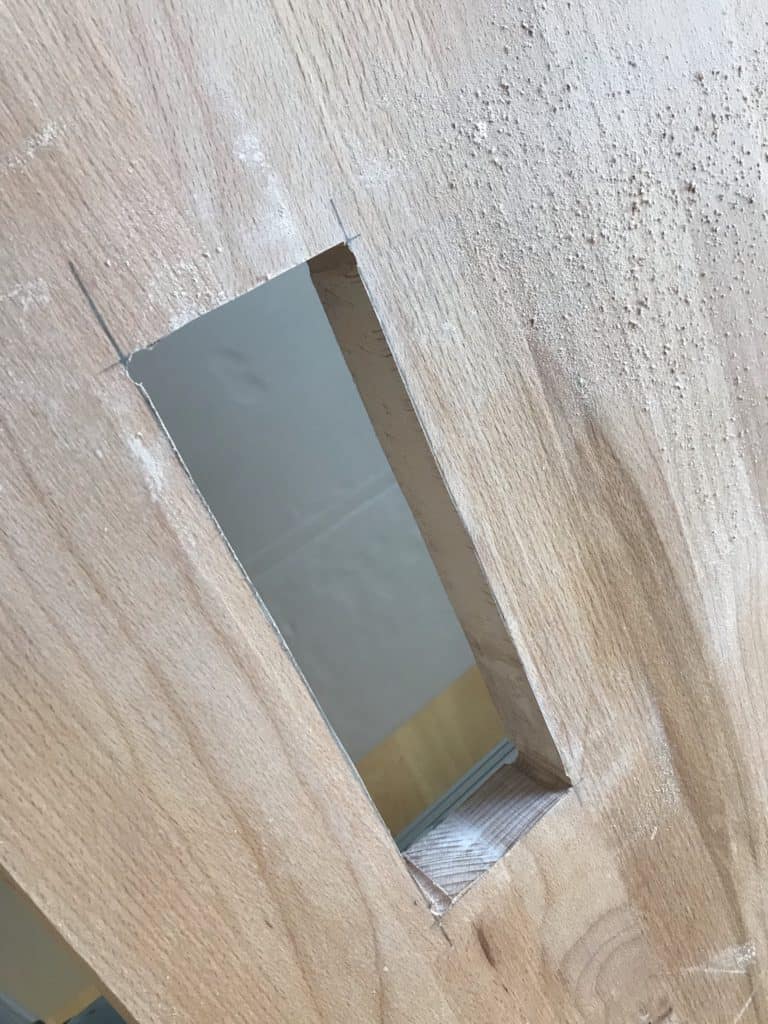
Briefly test whether everything fits and, if necessary, carefully rework.

If the cable outlets fit into the cut-out, you can remove them again before the surface treatment of the tabletop takes place. In case you bought a table top which doesn’t need any surface treatment (as linked above) you are good to go on.
How to Mount a USB Hub in a Tabletop
As a further functional highlight, a built-in USB Hub* is embedded in the tabletop. I placed it 12 cm below the right-hand cable outlet. Ultimately, you have to decide for yourself where the socket fits best and does not interfere with the mouse. Take into account where you are usually placing your cup of coffee!
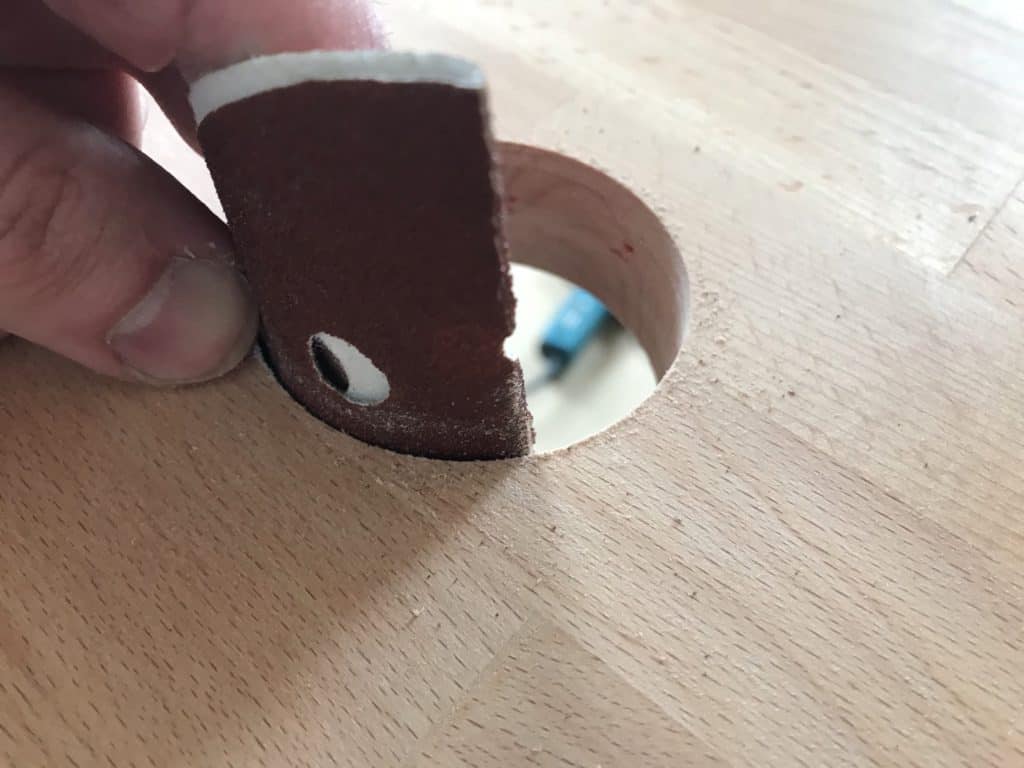
The USB Hubs* usually have a standard size of 60mm installation diameter. The easiest way to install them is with a cordless screwdriver and a suitable 60mm hole saw drill bit*.


Furthermore, I recommend that you do not drill through the solid wood in one pass. Instead drill half the thickness of the tabletop from above and half from below. As soon as the centering drill comes out on the underside of the tabletop, you can start at exactly this point and drill out the rest. I would also recommend drilling this way with veneered plywood in order to minimise cracks in the veneer on the underside.


You can sand the sharp edges briefly with a piece of sandpaper and then test whether the USB Hub fits.

Surface Treatment Table Top – How to Oil a Desk?
This step is optional. It depends on the table top you bought. In case you bought one which is already prepared and treated with oil, you obviously can skip this step.
In this project I have thought long and hard about how to treat the surface of a desk correctly. After all, the stress for the material shall not be underestimated. The forearms always rest in the same places and the mouse is constantly moved back and forth over the same area.
A varnish was not an option for me because, in case of flaking after a while, I don’t want to sand down the entire desk and treat it again. In the end, I decided on a hard wax oil from SAICOS* in the “satin” variant. If applied correctly, it creates a beautiful, resistant layer that can be easily re-oiled if necessary. In addition, the appearance remains very natural and the feel is also very pleasant. I am glad I decided to use this product and so far I have no regrets.
Before you start applying the oil, make sure you remove all dust and hair from the tabletop. Otherwise the oil will trap these residues during the curing process and you will achieve the opposite of a smooth surface.
Apply the hard wax oil evenly along the grain of the wood with a small paint roller. Do not forget the edges and the underside of the tabletop – otherwise it may warp.


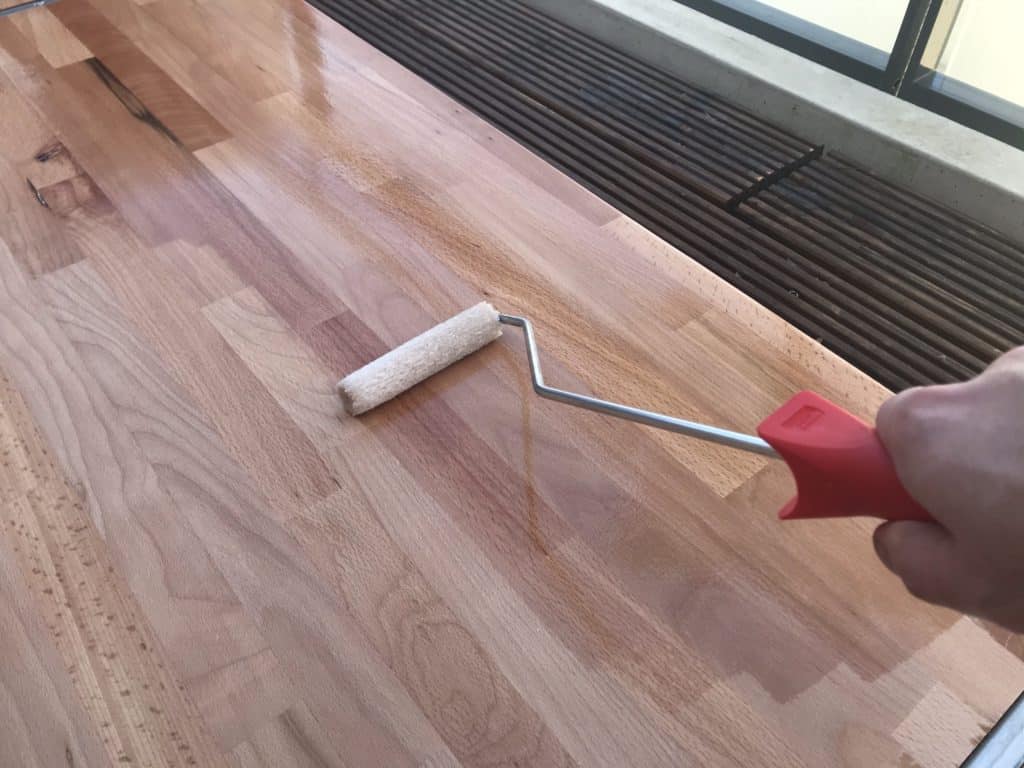

After the first pass, you can let the table top dry for about 3-4 hours and then apply the next coat. Two coats are sufficient. The hard wax oil is fully cured after 4-5 days.

Assembling the desk frame
The assembly of the Flexispot desk frame is relatively easy. The instructions are easy to understand and every necessary step is well documented. In principle, nothing can go wrong. Normally, the frame is screwed to the tabletop using the wood screws provided. I decided to use Insert-Nuts* in the tabletop and then fix the frame with machine screws. In case of a move, this avoids “wearing out” the existing holes.
First, follow the assembly instructions, adjust the frame to the desired tabletop width and place it on the underside of your desk top.


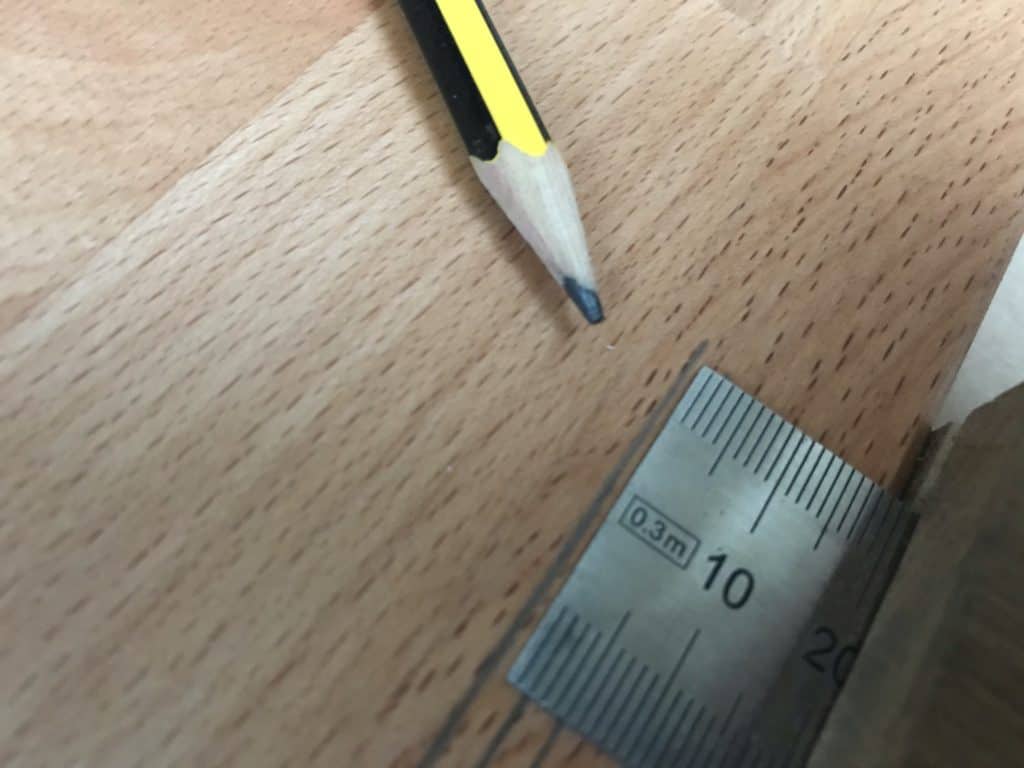
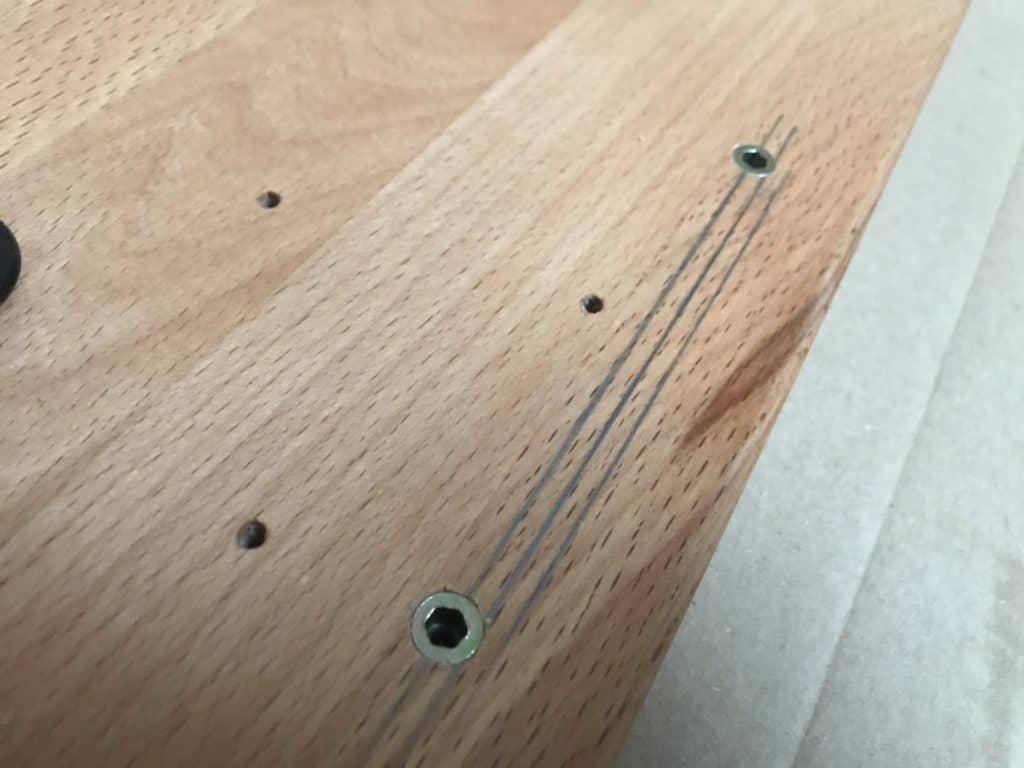
Then mark the holes where the frame is to be screwed to the tabletop. I used a drill for this, which I used to punch the holes. You should determine the position of the screw-in sockets as precisely as possible. A light tap on the drill with the folding rule is enough to ensure that the hole is punched exactly.


Do this for all the fixing holes marked in the instructions (8 holes in the side struts and 4 holes in the centre channel). Also marked with red files in the next picture.
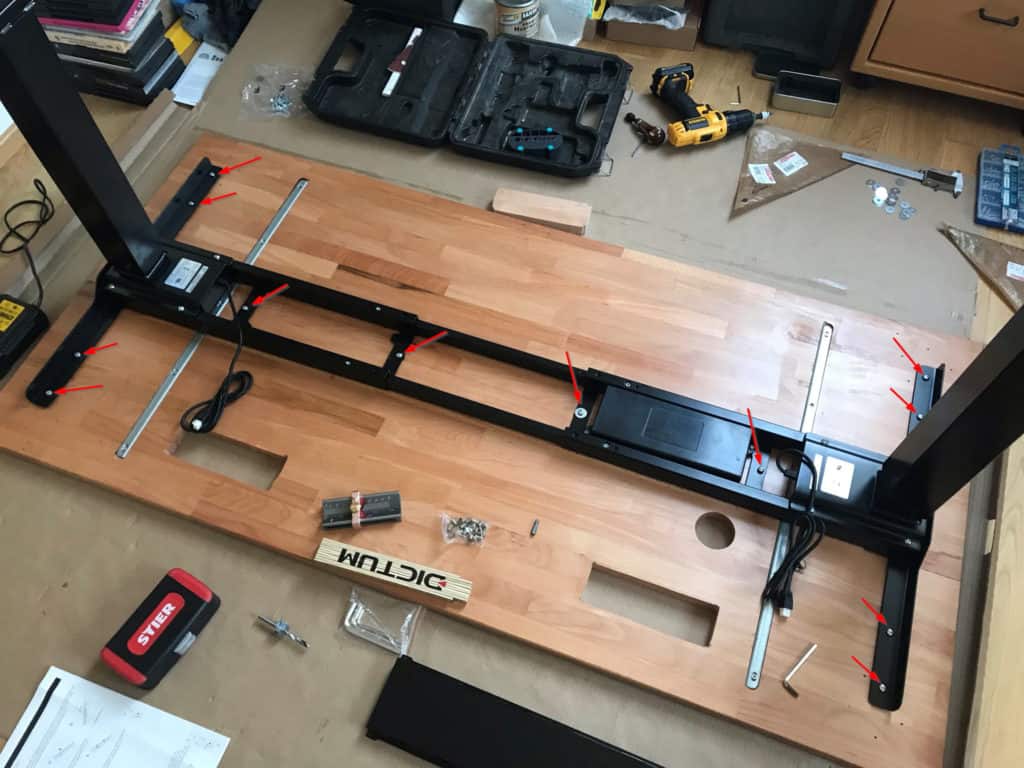
The markings are clearly visible on closer inspection and serve as a very precise reference for pre-drilling the holes for the screw-in sockets.

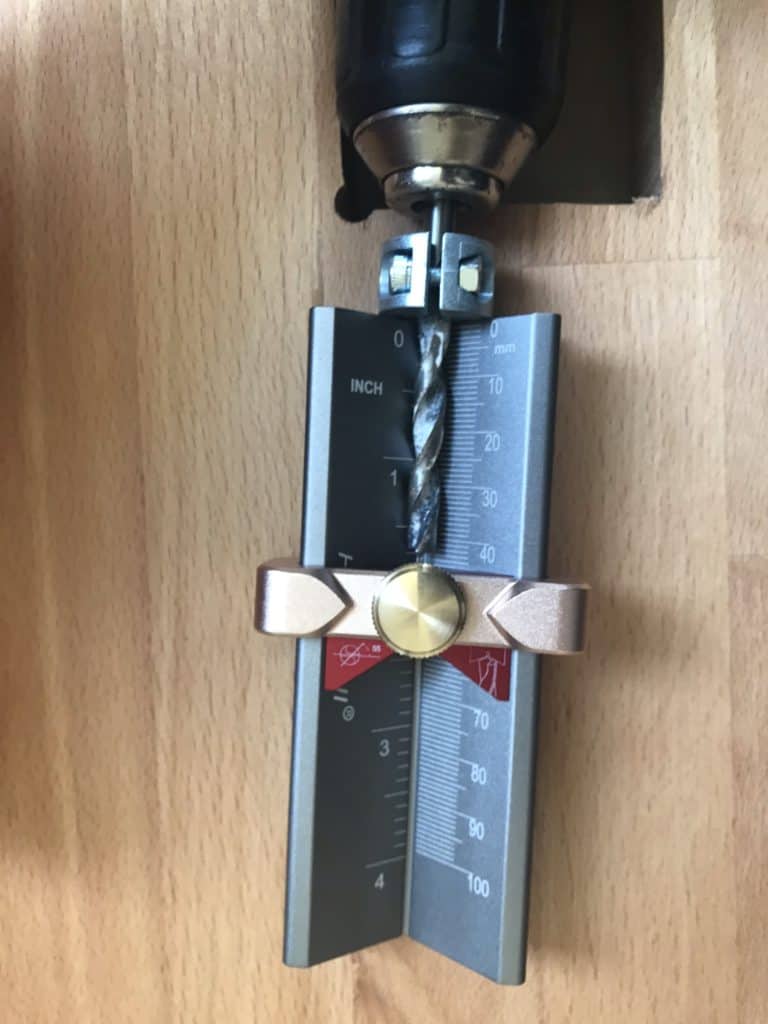
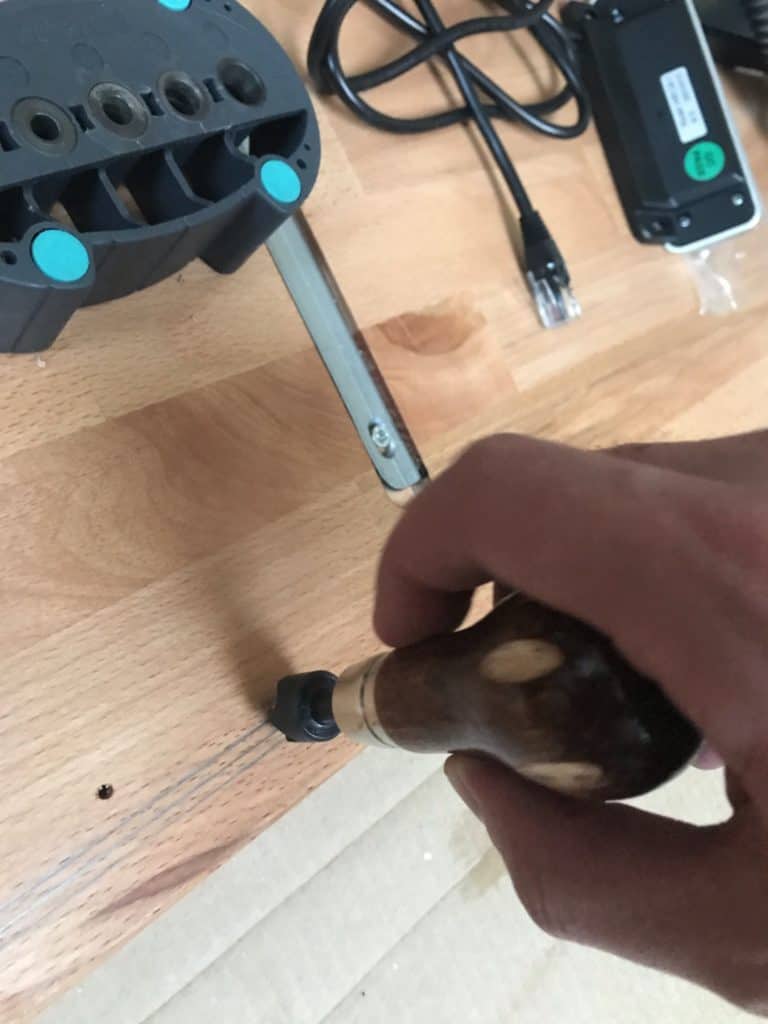
I decided to use M5x10mm insert-nuts for the fastening. These have an outer diameter of over 6mm. You can therefore pre-drill with a 6mm wood drill bit. To avoid accidentally drilling through the tabletop, I strongly recommend using depth stops* for the drill bits. When working with insert-nuts, drilling absolutely vertical is extremely important. Again, I use the drilling aid* for doing so. It makes it very easy and I can be sure that the holes are drilled exactly vertically.


I set the depth stop to a total of 45mm because of the additional depth needed for the drilling aid. The easiest way to do this is with small tools from China, such as the Hongdui Drill Depth Gauge*. I can absolutely recommend the Hongdui tools. You can find some of them at amazon. At the China Shops like Aliexpress or Banggood you can find even more.

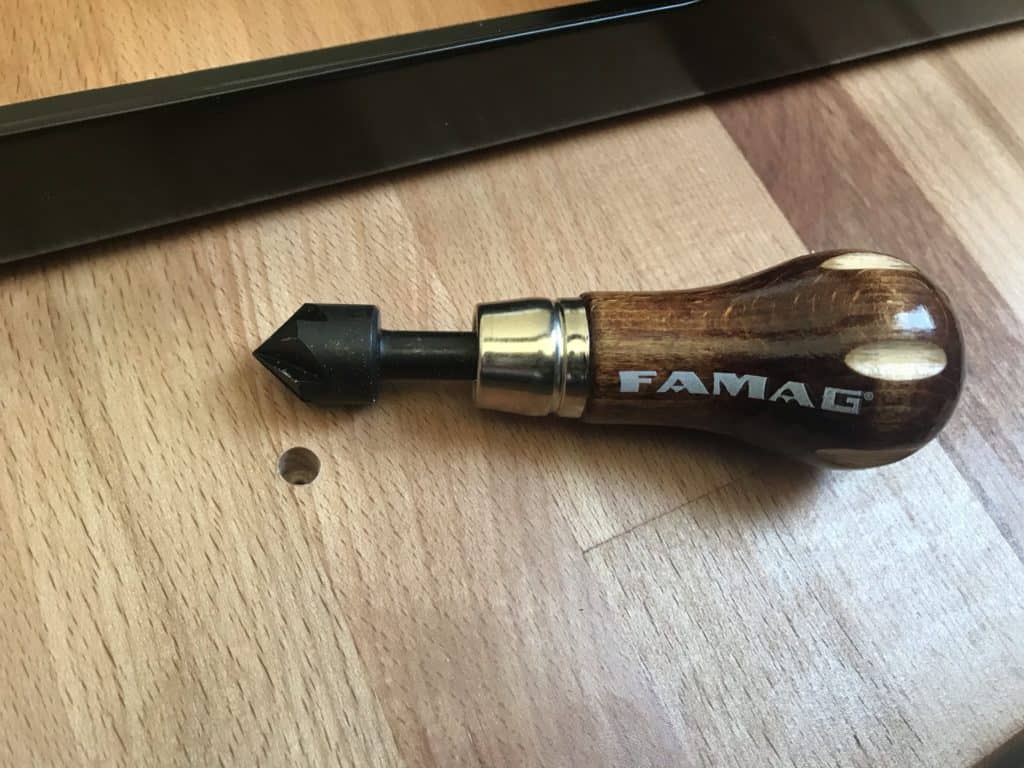
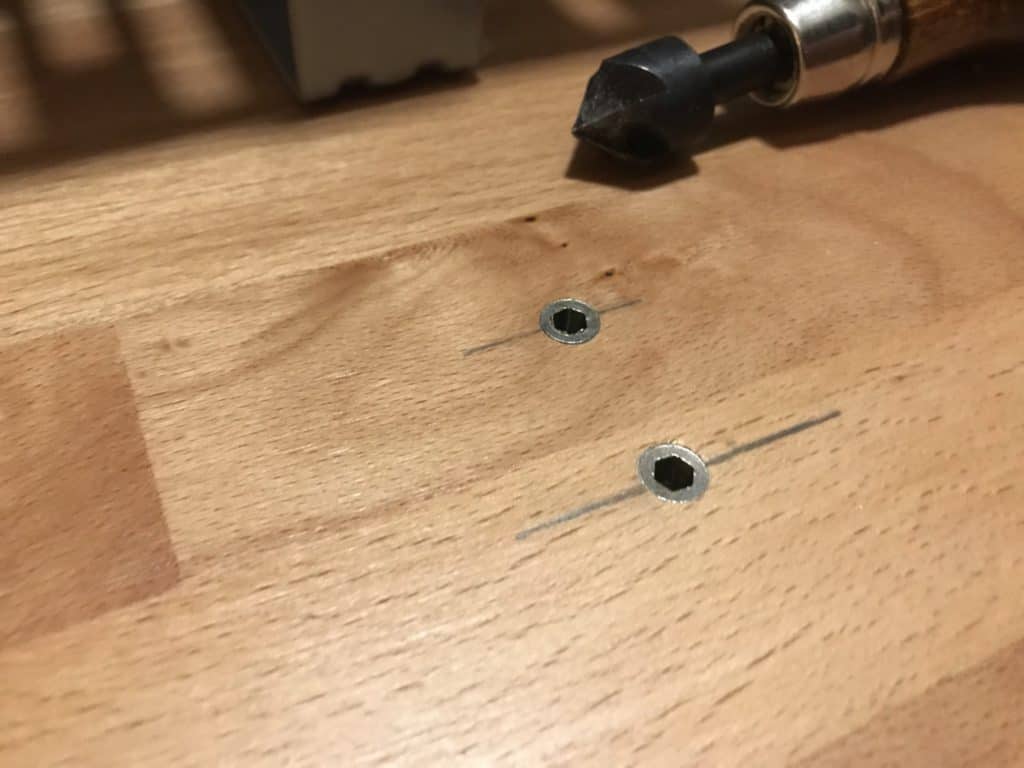
Now pre-drill the twelve holes accordingly. Before you carefully screw in the screw-in sleeves with the cordless screwdriver and with little torque, you should countersink* the pre-drilled holes so that the sleeves are absolutely flush with the surface.


Now you can screw together the frame and the tabletop by using M5x16mm bolts*.


Mounting the control panel
You can follow the same procedure for mounting the control panel. However, I used the smaller insert-nuts (M4x10mm)for this. You can find both versions in the linked insert-nut set.
Pre-drill this time with a 5mm wood drill bit. Before you do this, mark the desired position of the control element with the ruler 21mm from the front edge of the tabletop. I decided to fix it to my right – about 10cm from the right outer edge of the tabletop. But the position depends on the size of the control panel, too. So always place it the way it will work best for you.


You can now mount the control element with M4x10mm screws*.

Cable Management on the Height-Adjustable DIY Standing Desk
Central Frame Channel for the Desk Frame Electrics
After you have connected the control panel and both height-adjustable legs to the central control box of the table frame, you can neatly close the centre channel with the cover provided.


That was the first part of the cable management. The interesting part for all your cables on your PC and screens follows now.
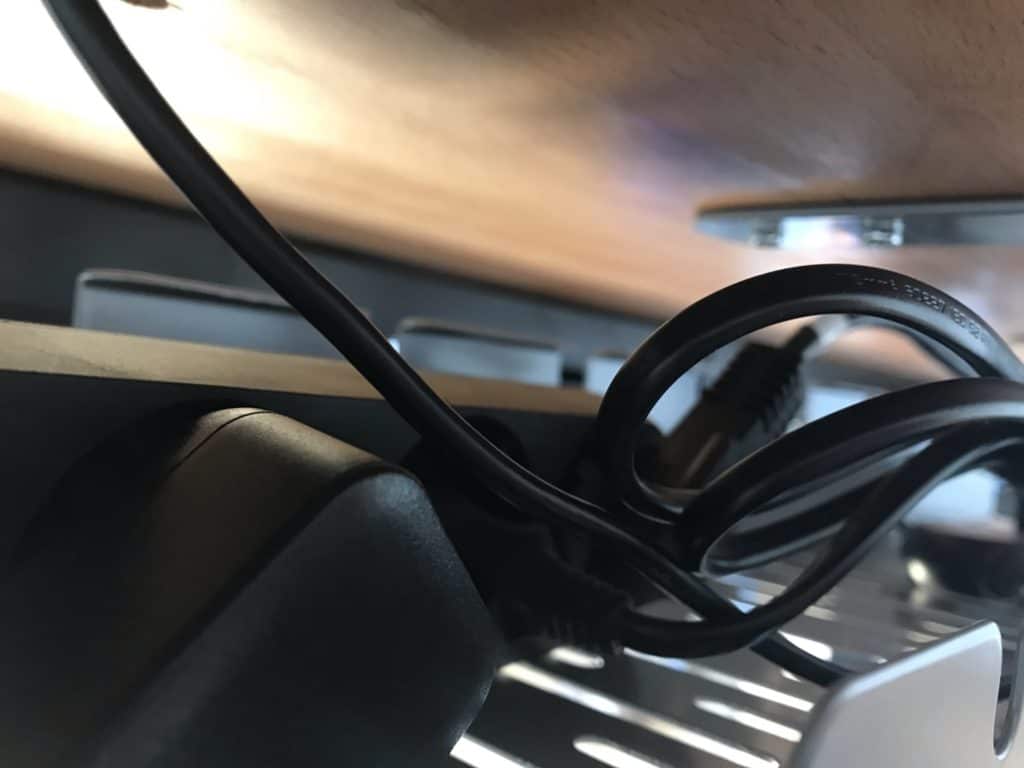
Moreover, a multi socket is needed directly under the desk top to ensure power supply to the screens and lamp even when the desk is fully extended. This can be ensured by installing an under desk cable management tray.

Furthermore, a flexible cable spine* is used to nicely route all cables from the desk to the computer.

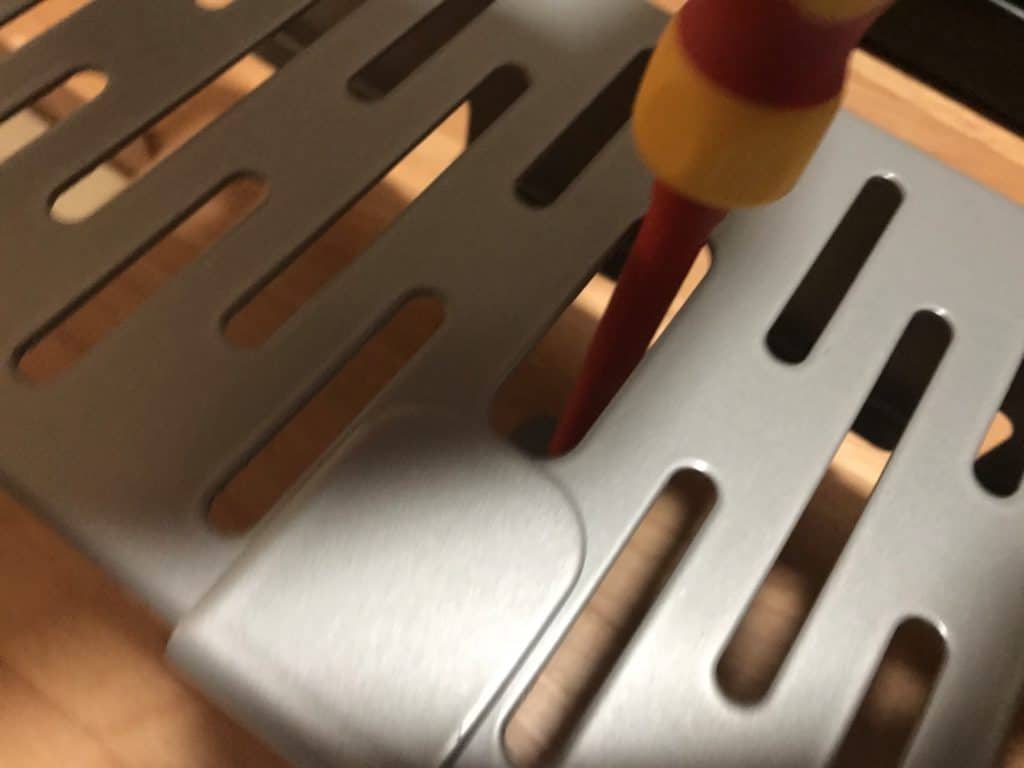
Under Desk Cable Management Tray
The cable management tray* can also be attached to the underside of the desk with insert-nuts. Alternatively you can just attach it to the desk top with simple wood screws.
I drilled the four holes for the under desk cable management tray* at the back with a distance of 10 cm to the edge of the tabletop, exactly in between the rectangular cable grommets. Then I countersunk the holes and screwed in the four M5x10mm insert-nuts.


The cable management tray first needs to be assembled with the two supplied brackets. Then you can screw the angles of the rail to the tabletop with M5x10mm screws*. Or just use wood screws in case you don’t want to use the insert-nuts for this.

An even easier to install Version of the Cable Management Tray you can find here*. It only has 2 holes and can be installed faster I think.
Cable Spine for Height-Adjustable DIY Standing Desks
To ensure that the cables to the computer are always neatly laid when adjusting the height and do not get caught anywhere, you should consider installing a cable spine*. The cable spine can be mounted on the side where the computer is going to be placed. I attached it right next to the right-hand rectangular cable grommet. Again, two M5x10 insert-nuts from the linked set and two M5x10 screws* are used for fastening.


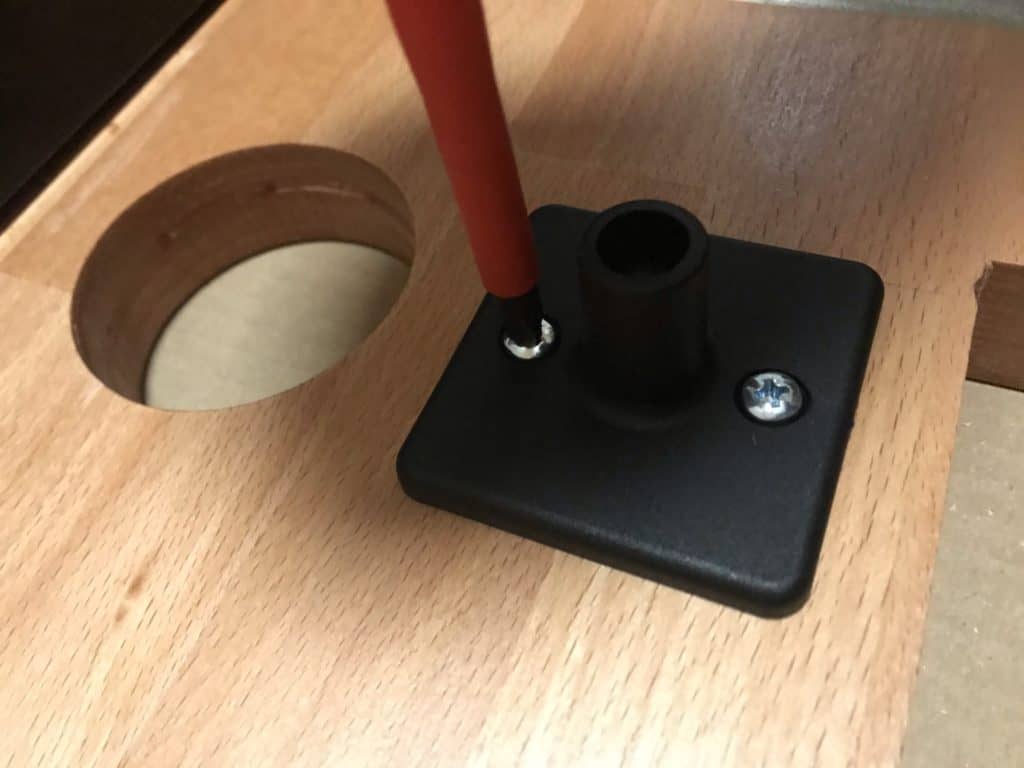

The cable spine is simply clipped into the round hole. There are a lot of different cable spines available on the market. The way you install them is quite similar all the time. Sometimes there is no separate clip but an attached metal plate you can attach to the tabletop.
Final Assembly and Putting the DIY Standing Desk into Operation
Now the desk can be set up and the cable grommets as well as te USB socket can be inserted.


Finally, all cables are pulled through and connected and the table is ready for use. The electronics do not need to be calibrated initially – the table legs are synchronised – it’s simply plug and play!


How to Build a DIY Standing Desk – The Final Result
Finally, the DIY Standing Desk is done! I think the result speaks for itself! Enjoy your new smart desk in your home office!

If you liked the project “How to Build a DIY Standing Desk”, or if you have any questions, just let me know in the comments! What do you think of the Smart DIY Desk? It’s definitely adding value to the home office!
Want to have a look at more DIY Projects? No Problem – check out more DIY Projects here!